Wednesday, December 13, 2023

WHITEN TEETH


Whiten Teeth

Assignment- Whiten all of the teeth pictures in the "WHITEN TEETH"  folder in your tvstudio class folder.  They are due by the end of the period. 

How To Whiten Teeth In Photoshop - Quick Summary


The picture is in your tv studio "whiten teeth " folder called ORIGINAL


FULL TUTORIAL BELOW: 

The original photo before whitening the teeth

The original image. Credit: Adobe Stock.

If I zoom in for a closer look, we see some yellow in the teeth, especially with the man on the left. Both people's teeth could also use some brightening. We can do both of these things (whiten and brighten teeth) using a single Hue/Saturation adjustment layer:
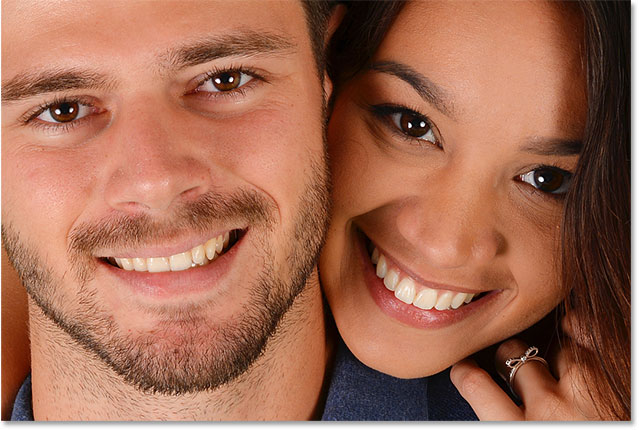
A close-up of the yellow teeth in the photo

Both people's teeth could be whiter and brighter.


How To Whiten Teeth In Photoshop

Step 1: Select The Polygonal Lasso Tool or the Lasso Tool

Start by drawing a selection around the teeth. Select the Lasso Tool from the Toolbar:
Selecting the Lasso Tool from the Toolbar in Photoshop.

Selecting the Lasso Tool.

Step 2: Draw A Selection Around The Teeth

If you're working on a photo with two or more people in it, as I am here, you may be tempted to select and whiten everyone's teeth at once. But the problem is, everyone's teeth are different and usually need different amounts of whitening. You'll get better results by whitening one person's teeth at a time. I'll start with the man on the left.

Draw a selection around the teeth. Don't worry if it's not the most accurate selection because we can easily clean it up later. Just trace around the teeth, staying as close to the edges as possible:
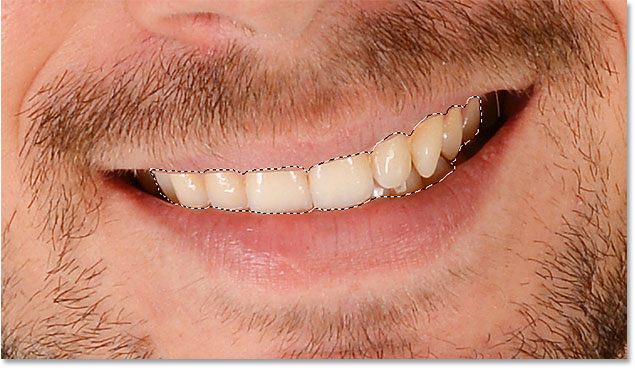
Selecting the teeth with the Lasso Tool in Photoshop

Drawing a selection outline around the teeth with the Lasso Tool.

**You will outline the teeth point by point.  If you make a mistake, hit your DELETE key on your keyboard, it will delete one point at a time.   (You won't have to start over)


When you finish selecting, make sure your first and last point meet, double click.

Step 3: Add A Hue/Saturation Adjustment Layer

Click the New Fill or Adjustment Layer icon at the bottom of the Layers panel:
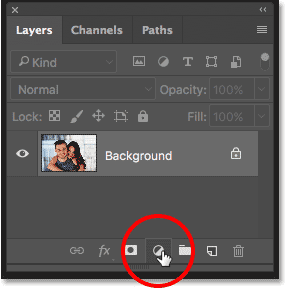
Clicking the New Fill or Adjustment Layer icon in the Layers panel in Photoshop

Clicking the New Fill or Adjustment Layer icon.

Choose Hue/Saturation from the list:
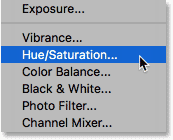
Adding a Hue/Saturation adjustment layer to use for whitening the teeth.

Selecting a Hue/Saturation adjustment layer.

A Hue/Saturation adjustment layer appears above the Background layer:
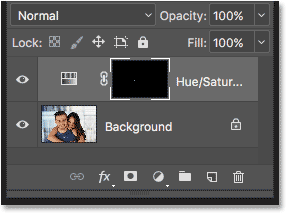
The Layers panel showing the Hue/Saturation adjustment layer.

The adjustment is added above the image.

Step 4: Change The Edit Option To Yellows

The controls and options for the Hue/Saturation adjustment layer are found in Photoshop's Properties panel. By default, Hue/Saturation affects all colors in the image equally, and that's because the Edit option is set to Master:
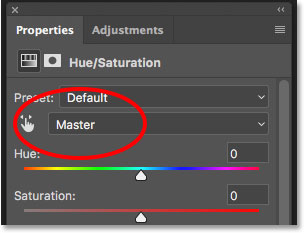
The Edit option for the Hue/Saturation adjustment layer is set to Master

The Edit option is set to Master by default.

To edit only the yellows in the image so we can remove the yellow from the teeth, change the Edit option to Yellows:
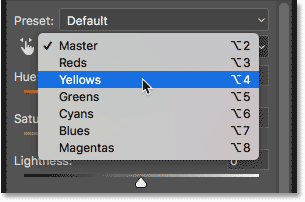
Changing the Hue/Saturation Edit option from Master to Yellow

Changing the Edit option from Master to Yellows.

Step 5: Lower The Saturation Of The Yellow

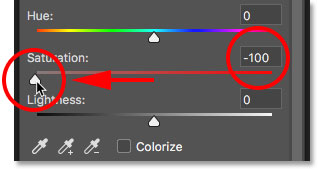
Click on the Saturation slider and begin dragging it to the left. The further you drag, the more you'll desaturate the yellow in the teeth, making them whiter. Keep in mind, though, that teeth naturally have some yellow in them. If you drag the Saturation slider all the way to the left, as I'm doing here:
Dragging the Saturation slider for the Hue/Saturation adjustment layer

Dragging the Saturation slider to -100.

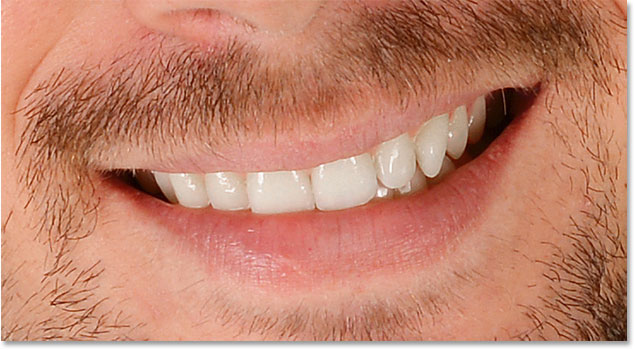
You'll remove the yellow completely, resulting in teeth that look dull and lifeless:
The image with too much yellow removed from the teeth, making the teeth look fake

Grayish-white is not a healthy look for teeth.

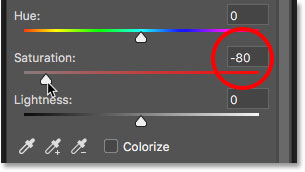
Instead, keep an eye on your image as you drag the slider and leave just enough yellow to keep the teeth looking natural. The setting you need will depend on how yellow the teeth were to begin with. For my image, a Saturation value of around -80 works well:
Dragging the Saturation slider to restore some of the yellow in the teeth.

Dialing back the Saturation value.

Whitening The Teeth: Before And After

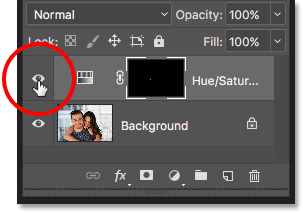
To better judge the results, compare the whitened version of the teeth with how they looked originally. In the Layers panel, click the Hue/Saturation adjustment layer's visibility icon. Click it once to temporarily hide the effects of the adjustment layer and view the original image. Click it again to turn the adjustment layer back on and view the whitened version:
Clicking the Hue/Saturation adjustment layer's visibility icon in the Layers panel.

Toggling the adjustment layer on and off with the visibility icon.

Here's a before-and-after comparison showing the improvement so far. The left half of the teeth are how they looked originally. The right half are how they look after removing most (but not all) of the yellow:
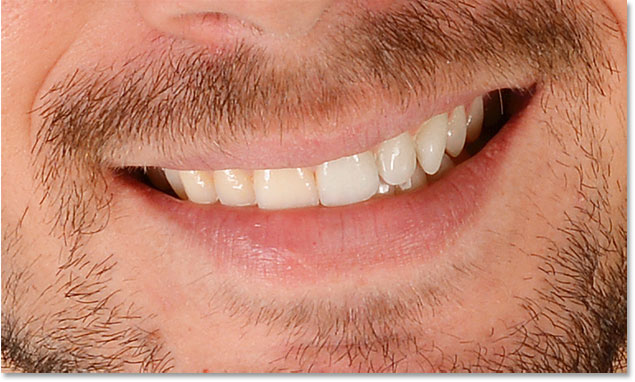
A before and after comparison after removing the yellow in the teeth to whiten them in Photoshop

A before (left) and after (right) comparison of the teeth whitening.

Step 6: Change The Edit Mode Back To Master

We've whitened the teeth, so now let's brighten them. Change the Edit option in the Properties panel from Yellows back to Master so we can adjust all colors at once, not just the yellows:

Changing the Hue/Saturation Edit option back to Master.

Setting Edit back to Master.

Step 7: Drag The Lightness Slider To Brighten The Teeth

Click the Lightness slider and begin dragging it towards the right. The further you drag, the lighter the teeth will appear. Keep an eye on your image as you drag the slider so you don't brighten them too much. For my image, a Lightness value of around +20 works well:
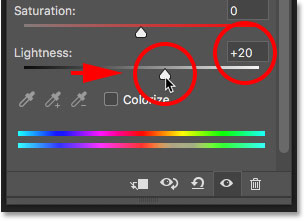
Increasing the Lightness value in Hue/Saturation to brighten the teeth.

Increasing Lightness to brighten the teeth.

The teeth are now looking brighter. But depending on how accurate you were when selecting the teeth with the Lasso Tool, you may notice some areas around the teeth that have also been brightened. In my case, there's some unwanted brightening in the lips and gums along the top and bottom of the teeth. We'll clean up these areas next:
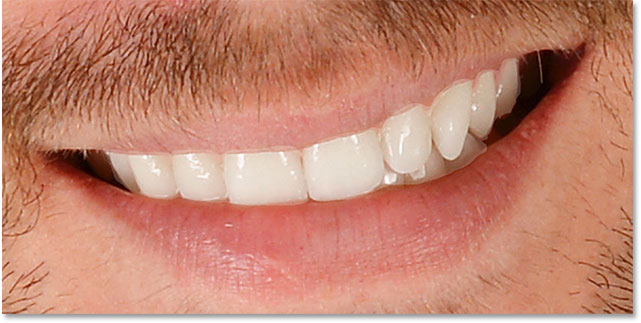
The teeth have been whitened but areas around them need to be cleaned up.

The teeth have been brightened, but so have areas around the teeth.


8, Whitening Teeth For More People In The Photo

As I mentioned earlier, for best results when whitening teeth for two or more people in the same photo, you'll want to use a separate Hue/Saturation adjustment layer for each person. We've already gone through the details of each step when I corrected the man's teeth, so I'll go through them again quickly here with the woman's teeth just so we can see how to work with multiple adjustment layers in Photoshop.

Selecting The Teeth

First, I'll reselect the Lasso Tool from the Toolbar. You can also select the Lasso Tool by pressing the letter L on your keyboard:

Reselecting the Lasso Tool from the Toolbar.

Reselecting the Lasso Tool.

Then, I'll draw a selection outline around the woman's teeth:
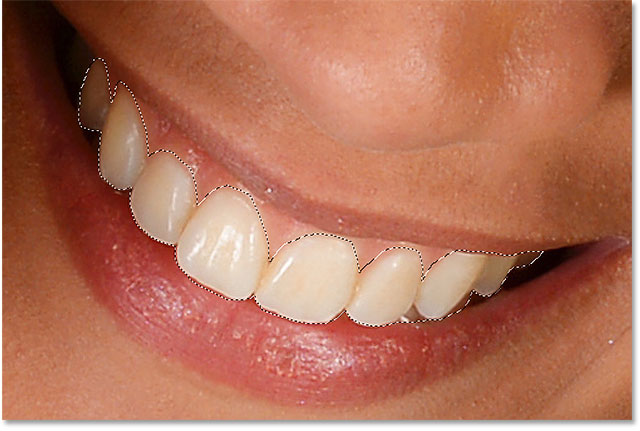
Selecting the teeth with the Lasso Tool in Photoshop

Selecting the woman's teeth with the Lasso Tool.

Adding A New Hue/Saturation Adjustment Layer

I'll click the New Fill or Adjustment Layer icon at the bottom of the Layers panel:
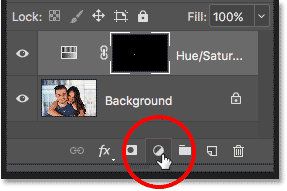
Clicking the New Fill or Adjustment Layer icon in the Layers panel.

Clicking the New Fill or Adjustment Layer icon.

Then I'll once again choose Hue/Saturation from the list:

Adding a separate Hue/Saturation adjustment layer for the woman's teeth.

Adding a separate Hue/Saturation adjustment layer for the woman's teeth.

A second Hue/Saturation adjustment layer is added. The one at the top is the one I'll be using to whiten the woman's teeth. The one below it is the original adjustment layer I used for the man's teeth:
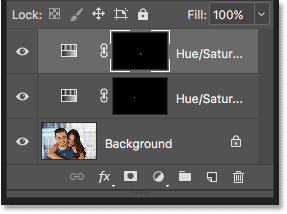
The Layers panel showing two Hue/Saturation adjustment layers.

The second adjustment layer appears above the first one.

Whitening The Teeth

With the second adjustment layer added, the steps for whitening and brightening her teeth are the same as before. In the Properties panel, I'll change the Edit option from Master to Yellows. Then I'll drag the Saturation slider to the left to reduce, but not completely remove, the yellow from her teeth. For the man's teeth, I lowered the saturation to a value of -80. This time, I don't need to go quite that far. A value of around -70 should do it:
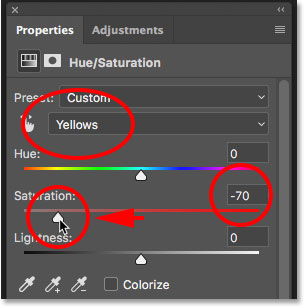
Reducing the yellow in the woman's teeth by lowering the color saturation.

The woman's teeth need less whitening than the man's.

Brightening The Teeth

To brighten her teeth, I'll change the Edit option from Yellows back to Master, then I'll increase the Lightness value by dragging the slider towards the right. Her teeth are already fairly bright so I won't push the Lightness value as far this time. I'll increase it to +10:
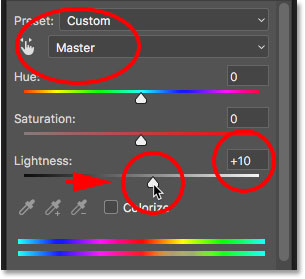
Brightening the woman's teeth by increasing the Lightness value for the Hue/Saturation adjustment layer.

Adding just a hint of brightening with the Lightness slider.


Before And After

And with that, we're done! Both people's teeth are now whiter and brighter. To compare the edited version of the image with the original version, press and hold the Alt (Win) / Option (Mac) key on your keyboard and click the Background layer's visibility icon:
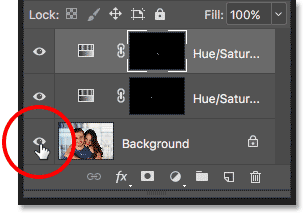
Clicking the Background layer's visibility icon while holding the Alt / Option key.

Clicking the Background layer's visibility icon while pressing Alt (Win) / Option (Mac).

This hides all layers in the document except the Background layer, revealing the original 

photo:

The original image in Photoshop before whitening the teeth.

Viewing the original image for comparison.

To turn the adjustment layers back on, press and hold Alt (Win) / Option (Mac) and click again on the Background layer's visibility icon. And here, after whitening the woman's teeth using a separate adjustment layer, is my final result:
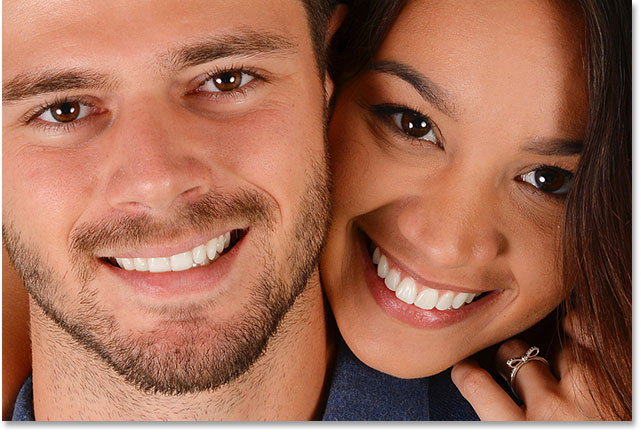
How to whiten teeth in Photoshop


QUICK OVERVIEW OF THE STEPS:

We covered a lot in this tutorial. Here's a quick summary of the steps for how to whiten teeth in Photoshop:

  • 01. First, select the Polygonal Lasso Tool and draw a selection around the teeth.
  • 02. In the Layers panel, click the New Fill or Adjustment Layer icon and choose a Hue/Saturation adjustment layer.
  • 03. In the Properties panel, change the Edit option from Master to Yellows.
  • 04. Drag the Saturation slider to the left to reduce the yellow in the teeth.
  • 05. Still in the Properties panel, change the Edit option from Yellows back to Master.
  • 06.. For images with two or more people, use a separate Hue/Saturation adjustment layer for each person for best results.

No comments:

EYE COLOR

  FIXING EYE COLOR   Fixing Red eyes in pics link:  https://mycooljournalism.blogspot.com/2021/12/fixing-red-eyes-in-pics.html _____________...

Tuesday, December 12, 2023

PHOTOSHOP PRACTICE- GRADED

 ASSIGNMENT:  GRADED: 90 POINTS

PHOTOSHOP QUIZ    

A.. IN YOUR STUDENT FOLDER IN TV STUDIO, CREATE A FOLDER CALLED FOLDER CALLED "levels"

B. once you SEE THE FOLDER

3. SE;ECT 3 OF YOUR FAVORITE PICS

ADJUST  LEVELS FOLDER

-1. MAKE A BACKGROUND COPY OF EACH PIC

-RENAME EACH PIC BY TYPING - EDIT  IN THE "SAVE AS" LINE

-2. ADJUST THE cmyk- cyan, magenta, yellow and black  LEVELS FOR EACH PIC

3. PUT A FRAME AROUND EACH PIC

4. TYPE A TITLE ON EACH PIC

5. PUT A RECTANGLE/ BOX AROUND EACH TITLE

6. REMEMBER TO SAVE

7. YOU MUST COMPLETE THESE STEPS FOR ALL 3 PICTURES.  100 POINTS

PHOTO QUIZ - LEVELS, FRAMES, NAMES AND LAYERS

 PHOTOSHOP QUIZ

 Monday, 12/20- Thursday, 12/23

PHOTOSHOP QUIZ    

A.. IN YOUR STUDENT FOLDER IN TV STUDIO, LOCATE THE FOLDER CALLED "adjust levels"

B. YOU WILL SEE THE FOLDER

3. DIRECTIONS FOR THE "ADJUST LEVELS2" FOLDER

ADJUST  LEVELS FOLDER

-1. MAKE A BACKGROUND COPY OF EACH PIC

-RENAME EACH PIC BY TYPING - EDIT  IN THE "SAVE AS" LINE

-2. ADJUST THE cmyk- cyan, magenta, yellow and black  LEVELS FOR EACH PIC

3. PUT A FRAME AROUND EACH PIC

4. TYPE A TITLE ON EACH PIC

5. PUT A RECTANGLE/ BOX AROUND EACH TITLE

6. REMEMBER TO SAVE

7. YOU MUST COMPLETE THESE STEPS FOR ALL 10 PICTURES.  100 POINTS


MAKE SURE ALL WORK IS SAVED IN YOUR PHOTO QUIZ FOLDER IN TVSTUDIO


ALL WORK IS DUE BEFORE YOU LEAVE CLASS ON WEDNESDAY 

Monday, December 11, 2023

INTRO TO PHOTOGRAPHY

 - Students will review introductory lesson in Photoshop

http://mycooljournalism.blogspot.com/2023/03/captions.html
-Students should complete a lesson in Photo Shop


1. Correct the contrast on three of their best shots…these will be graded
A. Fix the levels
B. Adjust the RGB
C. Adjust the individual colors: red, green, blue
D. Each photo should contain a caption using the caption rules stated below.

2. They should fix the contrast of the photos in tvstudio

3. Go through your photos and eliminate any unacceptable photos.  Adjust other photos.


Three Photos:
Edit Your three best photos
Write a caption for each
1. Nature/ Portrait / Group
1. Texture
1 your choice

Place pictures on MS Word and upload to www.turnitin.com
Caption Writing:
1.Check your facts. One of the most important aspects of any type of journalism is accuracy. If you use incorrect information, the story or photo loses credibility. Before uploading or printing any photo captions, make sure you’ve checked that anything stated in the caption is accurate.[3]
  • Don’t print an incorrect caption if you have trouble checking your facts, either because you can’t find an appropriate source, or because you’re on a deadline. It’s better to leave the information out if you aren’t sure it’s accurate.
2
Describe something that isn’t obvious. If a photo caption simply describes the visuals in the photo, it’s fairly useless. If you have a photo of a sunset and simply caption is as “a sunset” you’re not adding any additional information for the reader. Instead, describe details of the photo that are not obvious, like the location, the time of day or year, or a specific event that is taking place.[4]
  • For example, if you have a photo of a sunset you might want to caption it as: “Pacific coast sunset, March2016, from Long Beach, Vancouver Island."
  • Also avoid using terms like: “is shown,” “is pictured,” “and looks on,” or “above."


  1. Do not start a caption with certain words. A caption should not begin with the words ‘a,’ ‘an,’ or ‘the.’ These words are too basic and take up valuable captioning room when they aren’t necessary. For example, instead of saying: “A blue jay in the boreal forest;” simply say: “Blue jay flying through boreal forest.”[5]
    • Also, do not start a caption with the name of someone, start the caption with a description first and then include the name. For example, don’t say: “Stan Theman near Sunshine Meadow Park.” Instead say: “Jogger Stan Theman near Sunshine Meadow Park."
    • When identifying where someone is in a photo, you can say “from left.” You do not have to say “from left to right."

  2. 4
    Identify the main people in the photo. If your photo includes important people, identify who they are. If you know their names, include them (unless they’ve asked to remain anonymous). If you don’t know their names, you might want to put a description of who they are instead (e.g. “protesters on the streets of Washington, DC”).[6]
    • While it shouldn’t need to be said, make sure any and all names you use are spelled correctly and have the proper title.
    • If the photo includes a group of people, or some people who are not relevant to the story (i.e. their names are not required to tell the story), you do not have to name each of them in the caption.[7]

  3. 5
    Be as specific as possible. This advice goes hand-and-hand with being accurate. If you are unsure of where the photo was taken, or who is in the photo, find out. Showing a photo without any specific information may not be useful to the reader, especially if you cannot inform them of the context in which the photo was taken.[8]
    • If you were working with another journalist for the story, contact them for more information if needed.
    • If you are trying to identify a specific person in the photo, describing where in the photo they are is very useful. For example, if Bob Smith is the only one in a hat, you can say: “Bob Smith, back row in hat."
    • While specific is good, you can also phrase your caption so that is starts general and becomes more specific, or starts specific and ends more generally. Either method ensures specificity, but creates easy-to-ready statements.[9]

  4. 6
    Label historical photos properly. If you’re using an historical photo in your story, make sure it’s labelled properly and includes the date (at least the year) it was taken. Depending on who owns the photo, you may also need to credit another photography and/or organization (e.g. museum, archive, etc.).[10]

  5. 7
    Use the present tense in captions. Because most photos being shown as part of a news story are of things happening “right now,” use the present tense in the caption. An obvious exception would be any historical photos, where using the past tense makes sense.[11][12]
    • The nice thing about using the present tense is that it portrays a sense of immediacy and increases the impact of the photo on the reader.

  6. 8
    Avoid humour when the photo isn’t intended to be humorous. If the photo you’re captioning is of a serious or sombre event, don’t try to be funny in the caption. Funny captions should only be used when the photo itself is a joke or of a funny event that is intended to make the reader laugh.[13]
  7. Image titled Write Good Captions in Photojournalism Step 9
    9
    Remember to always include credits and citations. Every photo should include the name of the photographer and/or the organization that owns the photograph. In actual photographic magazines and publications, photos also include the technical details of how the photo was taken (e.g. aperture, film speed, f-stop, lens, etc.)[14]
    • When writing the credits, you don’t have to use the term “credited 
    • to” or “photo by” if the information is presented in a consistent and understandable format. For example, maybe the credits are always italicized or are a smaller font size.
    Avoiding Caption Mistakes:
    1. 1. Do not be arrogant. Arrogance in captions comes when the person writing the caption doesn’t care about the reader, and simply writes a caption that is easy at the moment of writing. This can also be consider being selfish because the writer cares more about themselves than the reader who is trying to decipher what the photo and story are about.[27]
      • This can also happen when a writer is trying to be ‘fancy’ and try something new or clever. There is no need to get complicated. Keep things simple, clear, and accurate.

    2. 2
      Avoid making assumptions. You know what they say about people who assume … ! The same goes for writing captions. These assumptions could be on the part of the journalist, photographer, or even someone else at the publication where everything is being put together. Don’t make assumptions about what was going on in the photo, or who the people are. Find out the truth and only include what’s accurate.[28]
      • This also goes for style and format. If you aren’t sure if the publication has a specific format for captions, ask. Don’t use a format you like that may need to be completely revised later because you didn’t ask.

    3. 3
      Make sure you aren’t sloppy. Sloppiness happens when someone just doesn’t care, or doesn’t consider the situation important enough to double-check. The result of sloppiness can be incorrect spelling, the wrong names for people in the photo, captions that don’t match the photos, referring to a photo in the story incorrectly, etc. If you’re proud of your work, do a good job from start to finish.[29]
      • This can also happen when someone tries to use another language in the caption, but doesn’t check if it has been written properly. Google Translate is not the same as double-checking if the language is correct!

    4. 4
      Remember that what you print is considered fact. As a journalist, whatever you print either in your story or caption is usually considered fact by your readers. They rightfully assume you’ve done your fact-checking and that what you’re telling them is accurate. If you were too lazy or sloppy to do the job, you risk passing along incorrect information to a large number of people.[30]
      • Also remember that once information gets “out there,” it can be hard to correct. Especially if that information is related to an event that was tragic, stressful or still ongoing.

Final Exam

Layout and Design Checkpoints: make a fold called FINAL EXAM NAME ALL PROJECTS FINAL EXAM Use guidelines to assure even tops and bottoms eve...