Monday, December 19, 2022

Cut out 2 ways


Cut out pics 2 Ways


Cutting out

 Cutting out:

1. Using the Eraser Tool

Learning to cut out in photoshop

1. import picture
2. Make a copy of the picture
3. delete the original picture layer
4. Go to the eraser tool

5. Adjust settings (Size of the eraser)

Erase an area of your picture


6  Save as tiff file
7. check transparency box


Type 2- Quick Selection Tool


1. You can cut out using any of the selection tools.

2. Using any of the selection tools.

A. call up your picture in Photoshop

B. Make a Copy

C. Delete the original

D. Select the     QUICK SELECTION TOOL

E. At he top, select Subject

F. Add a Mask (The tool is located under the layer panel)

G. Click on the picture side next to the mask

H. Select your ERASER tool

I. Adjust the levels

J. Begin to erase fine spots

K. Save AS a TIFF file

9. Check TRANSPARENCY Box

10 Make sure to rename

Thursday, March 04, 2021

Cutting out

 Cutting out:

1. Using the Eraser Tool

Learning to cut out in photoshop

1. import picture
2. Make a copy of the picture
3. delete the original picture layer
4. Go to the eraser tool

5. Adjust settings (Size of the eraser)

Erase an area of your picture


6  Save as tiff file
7. check transparency box


Type 2- Quick Selection Tool


1. You can cut out using any of the selection tools.

2. Using any of the selection tools.

A. call up your picture in Photoshop

B. Make a Copy

C. Delete the original

D. Select the     QUICK SELECTION TOOL

E. At he top, select Subject

F. Add a Mask (The tool is located under the layer panel)

G. Click on the picture side next to the mask

H. Select your ERASER tool

I. Adjust the levels

J. Begin to erase fine spots

K. Save AS a TIFF file

9. Check TRANSPARENCY Box

10 Make sure to rename


Tuesday, December 11, 2018

Cut outs
Cutting out an object
Learning to cut out in photoshop

1. import picture
2. Make a copy of the picture
3. delete the original picture layer
4. Go to the eraser tool
5. Adjust settings
6  Save as tiff file
7. check transparency box


II.  Circles/ shapes

Wednesday, March 10, 2021

QUICK SELECTION TOOL

 Type 2- Quick Selection Tool


1. You can cut out using any of the selection tools.

2. Using any of the selection tools.

A. call up your picture in Photoshop

B. Make a Copy

C. Delete the original

D. Select the     QUICK SELECTION TOOL

E. At he top, select Subject

F. Add a Mask (The tool is located under the layer panel)

NEXT: OPTION 1


G. Click on the picture side next to the mask

H. Select your ERASER tool

I. Adjust the levels

J. Begin to erase fine spots


OPTION 2

IF TOO MUCH WAS CUT OFF:

1. CLICK ON THE MASK SIDE OF THE LAYER AND USE YOUR ERASER TOOL TO REBUILD THE PHOTO

K. Save AS a TIFF file

9. Check TRANSPARENCY Box

10 Make sure to rename


Thursday, December 14, 2017

Poster Test

Test

1. You are going to make a poster of YOURSELF

2. Take at least 6 pictures of yourself. (you may use more)
-2 must be full body shots either sitting or standing
-2 must be head and shoulder shots
-2 your choice.  You may pose with friends

3. Create a New project in Photo Shop
4. Make it 8 x10 inches
5. Create a neat background to place all of you picture and title layers on.
6. Cut out all of your pics,save as tiff files, fix blemished, whiten teeth, fix any other "flaws", correct red eye
7. You must create a title with drop-shadow of your name.  This must be prominent
8. You must create at least 4 other titles that describe you.
- at least two titles must have a box with a border around it.
9. The entire project must be organized and contain all requirements, and have one color scheme
10. Save your project as a jpg.  Print it out on the color printer

Monday, December 12, 2022

Whiten Teeth


Whiten Teeth

Assignment- Whiten all of the teeth pictures in the "WHITEN TEETH"  folder in your tvstudio class folder.  They are due by the end of the period. 

How To Whiten Teeth In Photoshop - Quick Summary


The picture is in your tv studio "whiten teeth " folder called ORIGINAL


FULL TUTORIAL BELOW: 

The original photo before whitening the teeth

The original image. Credit: Adobe Stock.

If I zoom in for a closer look, we see some yellow in the teeth, especially with the man on the left. Both people's teeth could also use some brightening. We can do both of these things (whiten and brighten teeth) using a single Hue/Saturation adjustment layer:
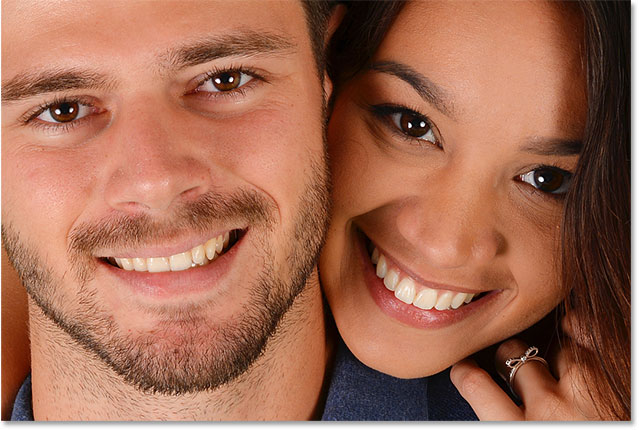
A close-up of the yellow teeth in the photo

Both people's teeth could be whiter and brighter.


How To Whiten Teeth In Photoshop

Step 1: Select The Polygonal Lasso Tool or the Lasso Tool

Start by drawing a selection around the teeth. Select the Lasso Tool from the Toolbar:
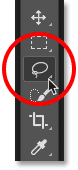
Selecting the Lasso Tool from the Toolbar in Photoshop.

Selecting the Lasso Tool.

Step 2: Draw A Selection Around The Teeth

If you're working on a photo with two or more people in it, as I am here, you may be tempted to select and whiten everyone's teeth at once. But the problem is, everyone's teeth are different and usually need different amounts of whitening. You'll get better results by whitening one person's teeth at a time. I'll start with the man on the left.

Draw a selection around the teeth. Don't worry if it's not the most accurate selection because we can easily clean it up later. Just trace around the teeth, staying as close to the edges as possible:
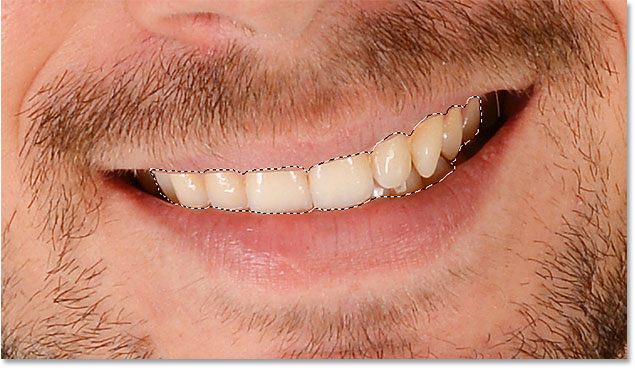
Selecting the teeth with the Lasso Tool in Photoshop

Drawing a selection outline around the teeth with the Lasso Tool.

**You will outline the teeth point by point.  If you make a mistake, hit your DELETE key on your keyboard, it will delete one point at a time.   (You won't have to start over)


When you finish selecting, make sure your first and last point meet, double click.

Step 3: Add A Hue/Saturation Adjustment Layer

Click the New Fill or Adjustment Layer icon at the bottom of the Layers panel:
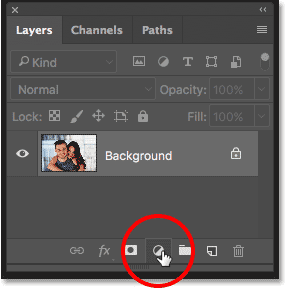
Clicking the New Fill or Adjustment Layer icon in the Layers panel in Photoshop

Clicking the New Fill or Adjustment Layer icon.

Choose Hue/Saturation from the list:
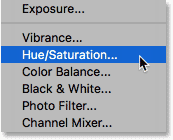
Adding a Hue/Saturation adjustment layer to use for whitening the teeth.

Selecting a Hue/Saturation adjustment layer.

A Hue/Saturation adjustment layer appears above the Background layer:
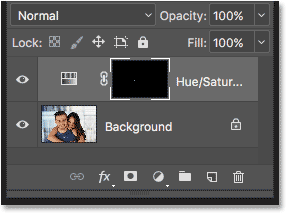
The Layers panel showing the Hue/Saturation adjustment layer.

The adjustment is added above the image.

Step 4: Change The Edit Option To Yellows

The controls and options for the Hue/Saturation adjustment layer are found in Photoshop's Properties panel. By default, Hue/Saturation affects all colors in the image equally, and that's because the Edit option is set to Master:
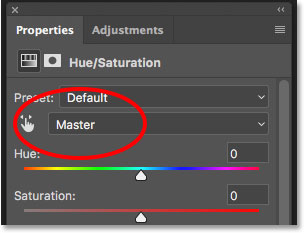
The Edit option for the Hue/Saturation adjustment layer is set to Master

The Edit option is set to Master by default.

To edit only the yellows in the image so we can remove the yellow from the teeth, change the Edit option to Yellows:
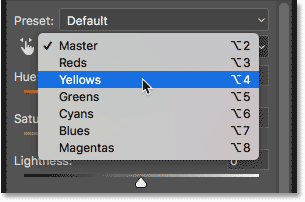
Changing the Hue/Saturation Edit option from Master to Yellow

Changing the Edit option from Master to Yellows.

Step 5: Lower The Saturation Of The Yellow

Click on the Saturation slider and begin dragging it to the left. The further you drag, the more you'll desaturate the yellow in the teeth, making them whiter. Keep in mind, though, that teeth naturally have some yellow in them. If you drag the Saturation slider all the way to the left, as I'm doing here:
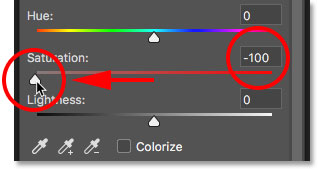
Dragging the Saturation slider for the Hue/Saturation adjustment layer

Dragging the Saturation slider to -100.

You'll remove the yellow completely, resulting in teeth that look dull and lifeless:
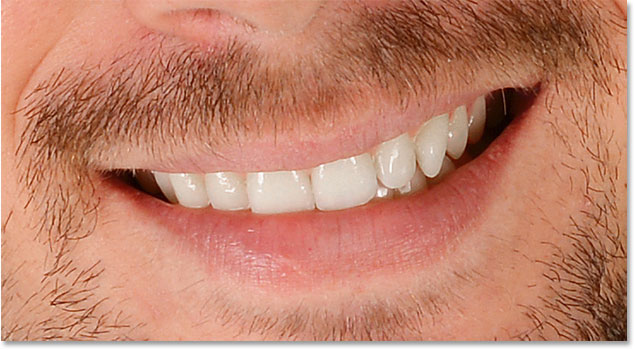
The image with too much yellow removed from the teeth, making the teeth look fake

Grayish-white is not a healthy look for teeth.

Instead, keep an eye on your image as you drag the slider and leave just enough yellow to keep the teeth looking natural. The setting you need will depend on how yellow the teeth were to begin with. For my image, a Saturation value of around -80 works well:
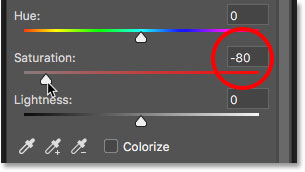
Dragging the Saturation slider to restore some of the yellow in the teeth.

Dialing back the Saturation value.

Whitening The Teeth: Before And After

To better judge the results, compare the whitened version of the teeth with how they looked originally. In the Layers panel, click the Hue/Saturation adjustment layer's visibility icon. Click it once to temporarily hide the effects of the adjustment layer and view the original image. Click it again to turn the adjustment layer back on and view the whitened version:
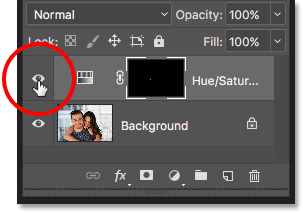
Clicking the Hue/Saturation adjustment layer's visibility icon in the Layers panel.

Toggling the adjustment layer on and off with the visibility icon.

Here's a before-and-after comparison showing the improvement so far. The left half of the teeth are how they looked originally. The right half are how they look after removing most (but not all) of the yellow:
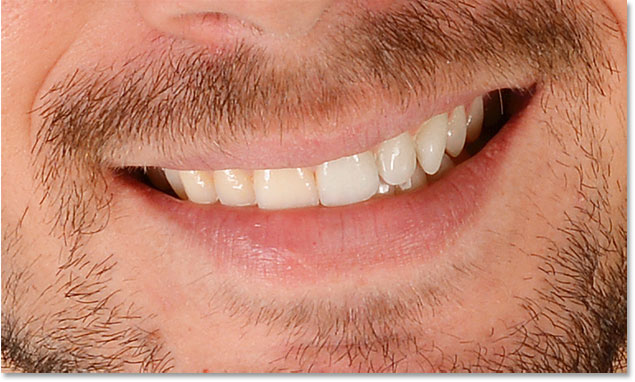
A before and after comparison after removing the yellow in the teeth to whiten them in Photoshop

A before (left) and after (right) comparison of the teeth whitening.

Step 6: Change The Edit Mode Back To Master

We've whitened the teeth, so now let's brighten them. Change the Edit option in the Properties panel from Yellows back to Master so we can adjust all colors at once, not just the yellows:

Changing the Hue/Saturation Edit option back to Master.

Setting Edit back to Master.

Step 7: Drag The Lightness Slider To Brighten The Teeth

Click the Lightness slider and begin dragging it towards the right. The further you drag, the lighter the teeth will appear. Keep an eye on your image as you drag the slider so you don't brighten them too much. For my image, a Lightness value of around +20 works well:
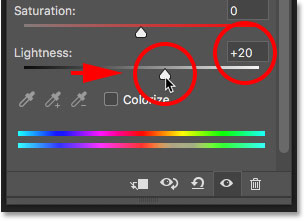
Increasing the Lightness value in Hue/Saturation to brighten the teeth.

Increasing Lightness to brighten the teeth.

The teeth are now looking brighter. But depending on how accurate you were when selecting the teeth with the Lasso Tool, you may notice some areas around the teeth that have also been brightened. In my case, there's some unwanted brightening in the lips and gums along the top and bottom of the teeth. We'll clean up these areas next:
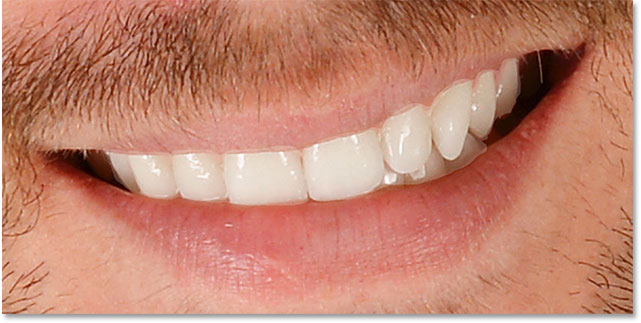
The teeth have been whitened but areas around them need to be cleaned up.

The teeth have been brightened, but so have areas around the teeth.


8, Whitening Teeth For More People In The Photo

As I mentioned earlier, for best results when whitening teeth for two or more people in the same photo, you'll want to use a separate Hue/Saturation adjustment layer for each person. We've already gone through the details of each step when I corrected the man's teeth, so I'll go through them again quickly here with the woman's teeth just so we can see how to work with multiple adjustment layers in Photoshop.

Selecting The Teeth

First, I'll reselect the Lasso Tool from the Toolbar. You can also select the Lasso Tool by pressing the letter L on your keyboard:

Reselecting the Lasso Tool from the Toolbar.

Reselecting the Lasso Tool.

Then, I'll draw a selection outline around the woman's teeth:
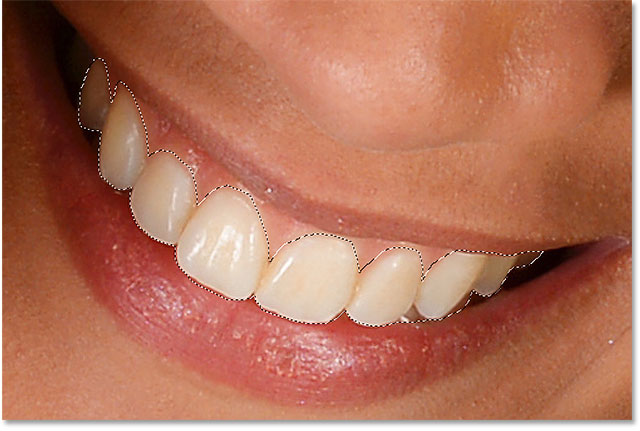
Selecting the teeth with the Lasso Tool in Photoshop

Selecting the woman's teeth with the Lasso Tool.

Adding A New Hue/Saturation Adjustment Layer

I'll click the New Fill or Adjustment Layer icon at the bottom of the Layers panel:
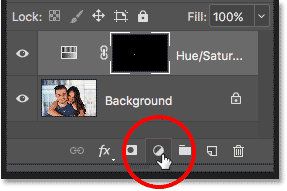
Clicking the New Fill or Adjustment Layer icon in the Layers panel.

Clicking the New Fill or Adjustment Layer icon.

Then I'll once again choose Hue/Saturation from the list:

Adding a separate Hue/Saturation adjustment layer for the woman's teeth.

Adding a separate Hue/Saturation adjustment layer for the woman's teeth.

A second Hue/Saturation adjustment layer is added. The one at the top is the one I'll be using to whiten the woman's teeth. The one below it is the original adjustment layer I used for the man's teeth:
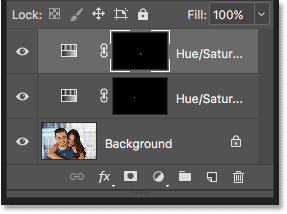
The Layers panel showing two Hue/Saturation adjustment layers.

The second adjustment layer appears above the first one.

Whitening The Teeth

With the second adjustment layer added, the steps for whitening and brightening her teeth are the same as before. In the Properties panel, I'll change the Edit option from Master to Yellows. Then I'll drag the Saturation slider to the left to reduce, but not completely remove, the yellow from her teeth. For the man's teeth, I lowered the saturation to a value of -80. This time, I don't need to go quite that far. A value of around -70 should do it:
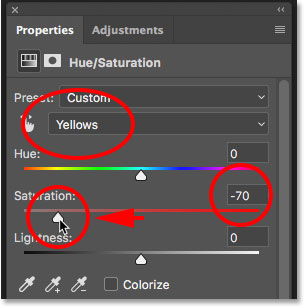
Reducing the yellow in the woman's teeth by lowering the color saturation.

The woman's teeth need less whitening than the man's.

Brightening The Teeth

To brighten her teeth, I'll change the Edit option from Yellows back to Master, then I'll increase the Lightness value by dragging the slider towards the right. Her teeth are already fairly bright so I won't push the Lightness value as far this time. I'll increase it to +10:
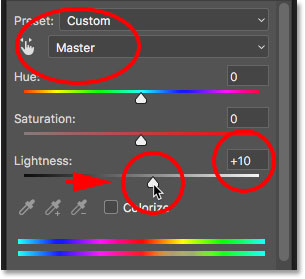
Brightening the woman's teeth by increasing the Lightness value for the Hue/Saturation adjustment layer.

Adding just a hint of brightening with the Lightness slider.


Before And After

And with that, we're done! Both people's teeth are now whiter and brighter. To compare the edited version of the image with the original version, press and hold the Alt (Win) / Option (Mac) key on your keyboard and click the Background layer's visibility icon:
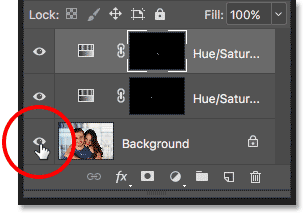
Clicking the Background layer's visibility icon while holding the Alt / Option key.

Clicking the Background layer's visibility icon while pressing Alt (Win) / Option (Mac).

This hides all layers in the document except the Background layer, revealing the original 

photo:

The original image in Photoshop before whitening the teeth.

Viewing the original image for comparison.

To turn the adjustment layers back on, press and hold Alt (Win) / Option (Mac) and click again on the Background layer's visibility icon. And here, after whitening the woman's teeth using a separate adjustment layer, is my final result:
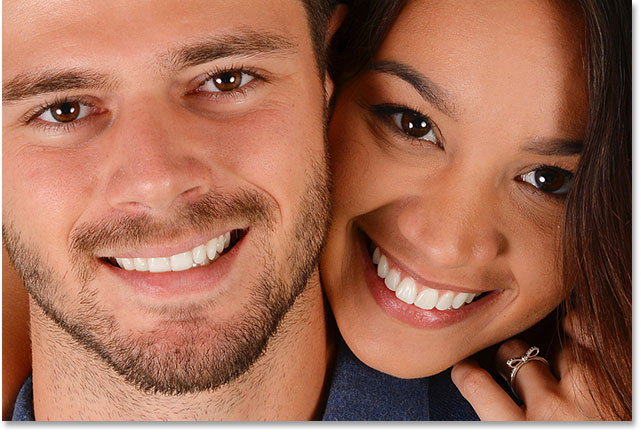
How to whiten teeth in Photoshop


QUICK OVERVIEW OF THE STEPS:

We covered a lot in this tutorial. Here's a quick summary of the steps for how to whiten teeth in Photoshop:

  • 01. First, select the Polygonal Lasso Tool and draw a selection around the teeth.
  • 02. In the Layers panel, click the New Fill or Adjustment Layer icon and choose a Hue/Saturation adjustment layer.
  • 03. In the Properties panel, change the Edit option from Master to Yellows.
  • 04. Drag the Saturation slider to the left to reduce the yellow in the teeth.
  • 05. Still in the Properties panel, change the Edit option from Yellows back to Master.
  • 06.. For images with two or more people, use a separate Hue/Saturation adjustment layer for each person for best results.

Monday, November 07, 2022

Article 2

  Goals:

Students will begin their  news article
Brainstorm topics for their  article
Students will plan their articles via “Organization Sheet” (See top right corner of blog
Students will begin writing interview questions
Students will complete interviews
Students will begin to organize research and interview information
Students will begin rough draft
++++++++++++++++++++++++++++++++
NEWS ARTICLE #2
Monday, 11/7- Wednesday, 11/9- Students will brainstorm ideas for their next articles and begin planning sheets
- Students will create interview questions and turn in their planning sheets
**ALL QUESTIONS MUST BE APPROVED BY MRS. CHRISTIAN BEFORE SETTING UP INTERVIEWS
**TURN YOUR PLANNING SHEET  IN TO GOOGLE CLASSROOM BY THE END OF THE PERIOD ON MONDAY, 9/26 (Please submit your questions to the entry entitled: STORY ORGANIZATION SHEET
STORY ORGANIZATION SHEET LINK:

11/8-11/15- Students will continue to interview and organize interview answers

Wednesday, 11/16-completed interviews due by 2:40- If they are not turned in, points will be deducted

Friday, 11/18 -ALL QUESTIONS AND ANSWERS WILL BE TURNED IN TO: 
 GOOGLE CLASSROOM BY THE END OF THE PERIOD (Please submit your questions to the entry entitled: QUESTIONS AND ANSWER SHEET)

FINAL due date: 3:00PM- TBD


**Remember, once you have your interviews, you may start writing your rough drafts
***Even if you don't have all of your interviews completed on any of the days, work on background info and rough draft
Closure Activity:

**PLEASE REMEMBER, YOU CAN BEGIN WRITING YOUR ARTICLE AT ANY TIME. YOU DON'T HAVE TO WAIT UNTIL YOUR INTERVIEWS ARE CONDUCTED.

**All leads and second paragraphs must be checked by Mrs. Christian

Planning sheet for article:

https://docs.google.com/document/d/1pb7RAhgArP9rwZBmUiIhABVI8frPv_mp/edit?usp=sharing&ouid=115237694256539959089&rtpof=true&sd=true

.5.11.B- Write using well-developed content appropriate for the topic
1.5.11.C- Write with controlled and/ or subtle organization
1.9.11.A: Use media and technology resources for research, information analysis, problem solving, and decision making in content learning. Identify complexities and inconsistencies in the information and the different perspectives found in each medium.
1.9.11.B: Evaluate how the techniques used in media modify traditional society.
1.2.11B - use and understand a variety of media and evaluate the quality of material

Friday, September 23, 2022

Inerviews and Articles


NEWS ARTICLE 1


News Article 1

 Goals:

Students will begin their  news article
Brainstorm topics for their  article
Students will plan their articles via “Organization Sheet” (See top right corner of blog
Students will begin writing interview questions
Students will complete interviews
Students will begin to organize research and interview information
Students will begin rough draft
++++++++++++++++++++++++++++++++
NEWS ARTICLE #2
Thursday, 9/22- Students will brainstorm ideas for their next articles and begin planning sheets

Friday, 9/23 and Monday, 9/26 - Students will create interview questions and turn in their planning sheets
**ALL QUESTIONS MUST BE APPROVED BY MRS. CHRISTIAN BEFORE SETTING UP INTERVIEWS
**TURN YOUR PLANNING SHEET  IN TO GOOGLE CLASSROOM BY THE END OF THE PERIOD ON MONDAY, 9/26 (Please submit your questions to the entry entitled: STORY ORGANIZATION SHEET
STORY ORGANIZATION SHEET LINK:

9/26-9/28- Students will continue to interview and organize interview answers

Tuesday, 11/4 -completed interviews due by 2:40- If they are not turned in, points will be deducted

Wednesday, 10/5-ALL QUESTIONS AND ANSWERS WILL BE TURNED IN TO: 
 GOOGLE CLASSROOM BY THE END OF THE PERIOD ON WEDNESDAY, 10/5 (Please submit your questions to the entry entitled: QUESTIONS AND ANSWER SHEET)

FINAL due date: 3:00PM- TBD


**Remember, once you have your interviews, you may start writing your rough drafts
***Even if you don't have all of your interviews completed on any of the days, work on background info and rough draft
Closure Activity:

**PLEASE REMEMBER, YOU CAN BEGIN WRITING YOUR ARTICLE AT ANY TIME. YOU DON'T HAVE TO WAIT UNTIL YOUR INTERVIEWS ARE CONDUCTED.

**All leads and second paragraphs must be checked by Mrs. Christian


If time allows, continue to review articles in other HS newspapers across America. Look for creative story ideas.....Remember, we will be assigning new articles in the near future

**All leads and second paragraphs must be checked by Mrs. Christian

Rough Drafts are due Wednesday, 10/6

Each Person must have 2 peers proof their article

and

Each person MUST read their article aloud to a peer

The peers should receive a shared version of the article, AND make comments on it


Final Draft Due

Score Sheet:

https://docs.google.com/document/d/1kB8Bo1JL4p-JVNERy7OLMGydlIp0yK91/edit?usp=sharing&ouid=115237694256539959089&rtpof=true&sd=true

Please look over the score sheet before turning in your final version

resources:

Planning sheet for article:

https://docs.google.com/document/d/1pb7RAhgArP9rwZBmUiIhABVI8frPv_mp/edit?usp=sharing&ouid=115237694256539959089&rtpof=true&sd=true

.5.11.B- Write using well-developed content appropriate for the topic
1.5.11.C- Write with controlled and/ or subtle organization
1.9.11.A: Use media and technology resources for research, information analysis, problem solving, and decision making in content learning. Identify complexities and inconsistencies in the information and the different perspectives found in each medium.
1.9.11.B: Evaluate how the techniques used in media modify traditional society.
1.2.11B - use and understand a variety of media and evaluate the quality of material

Final Exam

Layout and Design Checkpoints: make a fold called FINAL EXAM NAME ALL PROJECTS FINAL EXAM Use guidelines to assure even tops and bottoms eve...